In this example, you'll create a new solution with two projects: a service, a host and a client. When you run the service, you'll expose a single service endpoint. The client application will access service operations through that endpoint. You'll host the service in a console application and invoke the service using a manually constructed proxy. This example will teach you the basic requirements for creating, hosting, and consuming a service with WCF.
The complete source code is available .
System Requirements
This section describes the supporting operating systems, and software you need to be able to complete the examples described below. You should install these requirements in the order of their appearance in this list:
- Windows 7 or Windows Server 2008 or higher
- Microsoft Visual Studio 2013 (Express Edition is free)
- Microsoft .NET 4.5 framework runtime (this is installed with Visual Studio 2013)
- WSCF.blue http://wscfblue.codeplex.com/ (contract first development tool)
- An example WSDL file. See section 6.2.
Example WSDL
For this example, the following WSDL will be used to generate the service and a client. See Figure 1 - Example WSDL. As you can see the service has a single operation, called NewOperation, which takes a NewInputMessage type and returns a NewOutputMessage type. 
Figure 1 - Example WSDL Paste the following into a text file and save it as Example.wsdl.
<?xml version="1.0" encoding="utf-8"?>
<wsdl:definitions name="WebServiceName"
targetNamespace="http://example.com/" xmlns:soap="http://schemas.xmlsoap.org/wsdl/soap/" xmlns:soapenc="http://schemas.xmlsoap.org/soap/encoding/" xmlns:xsi="http://www.w3.org/2001/XMLSchema-instance" xmlns:mime="http://schemas.xmlsoap.org/wsdl/mime/"
xmlns:tns="http://example.com/"
xmlns:xs="http://www.w3.org/2001/XMLSchema" xmlns:soap12="http://schemas.xmlsoap.org/wsdl/soap12/" xmlns:http="http://schemas.xmlsoap.org/wsdl/http/" xmlns:wsdl="http://schemas.xmlsoap.org/wsdl/">
<wsdl:types>
<xs:schema elementFormDefault="qualified"
targetNamespace="http://example.com/">
<xs:element name="InputType">
<xs:complexType>
<xs:sequence>
<xs:element name="input" type="xs:string" />
</xs:sequence>
</xs:complexType>
</xs:element>
<xs:element name="OutputType">
<xs:complexType>
<xs:sequence>
<xs:element name="output" type="xs:string" />
</xs:sequence>
</xs:complexType>
</xs:element>
</xs:schema>
</wsdl:types>
<wsdl:message name="NewInputMessage">
<wsdl:part name="InputMessagePart" element="tns:InputType" />
</wsdl:message>
<wsdl:message name="NewOutputMessage">
<wsdl:part name="OutputMessagePart" element="tns:OutputType" />
</wsdl:message>
<wsdl:portType name="NewPortType">
<wsdl:operation name="NewOperation">
<wsdl:input message="tns:NewInputMessage" />
<wsdl:output message="tns:NewOutputMessage" />
</wsdl:operation>
</wsdl:portType>
<wsdl:binding name="NewBinding" type="tns:NewPortType">
<soap:binding transport="http://schemas.xmlsoap.org/soap/http" />
<wsdl:operation name="NewOperation">
<wsdl:input>
<soap:body />
</wsdl:input>
<wsdl:output>
<soap:body />
</wsdl:output>
</wsdl:operation>
</wsdl:binding>
<wsdl:service name="NewService">
<wsdl:port name="NewPort" binding="tns:NewBinding">
<soap:address location="http://example.com/example" />
</wsdl:port>
</wsdl:service>
</wsdl:definitions>
Creating a New Service
The first thing you will need to do is create a new service based on the WSDL above.
- Beginning from scratch – open a new instance of Visual Studio 2013 and create a new WCF Service Library Project called Example.Service. Name the solution Example. Verify that the .NET Framework version selected in the dropdown list is set to .NET Framework 4.5, as shown in Figure 2. Click OK to create the project.
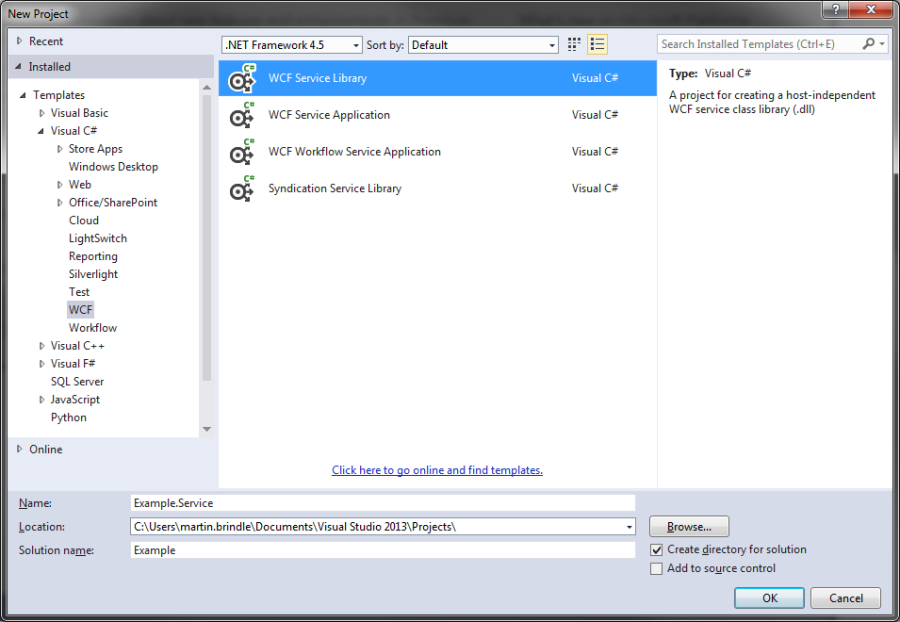
Figure 2 - Creating the Example.Service WCF Service Library project
- By default, Visual Studio will create a template interface (IService1.cs) and service implementation class (Service1.cs), which would be used when writing a code-first service. We can safely delete these two files as we will be using a contract first approach - i.e. our service is based on a WSDL. See Figure 3 - New project default files.
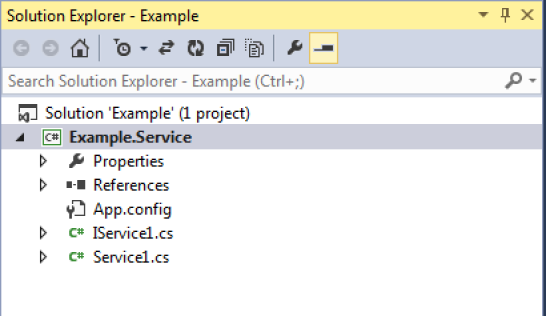
Figure 3 - New project default files
- Visual Studio comes with a tool called svcutil, which will generate the proxy classes for us, but WSCF.blue makes our life a little easier. In Solution Explorer, right-click on Example.Service and select "Choose WSDL to Implement…" from the WSCF.blue menu. A dialog will appear. Choose the Example.wsdl file you saved from Section 6.2 and complete the information as shown in Figure 4 - WSCF.blue server-side configuration. The following settings are:
- Service-side stub – generate the classes for the service side;
- Adjust Casing – which simply changes the casing of the classes to match the conventions of C#;
- Single Concurrency – A single request has access to the WCF service object at a given moment of time. So only one request will be processed at any given moment of time. The other requests have to wait until the request processed by the WCF service is completed A single request has access to the WCF service object at a given moment of time. So only one request will be processed at any given moment of time. The other requests have to wait until the request processed by the WCF service is completed.
- Per-Call Instance – new WCF instances are created for every method call made to the WCF server service. The default concurrency is Single so only one thread will be used to serve all instances.
- Use Synchronisation Context – ties WCF to the thread that created the host where applications that need to update some GUI from other threads.
- Generate abstract classes – this allows us to inherit from the generated stub, so if we need to regenerate from the WSDL at any point, we don't lose any implementation.
- WCSF.blue will add a System.ServiceModel reference to your project, as well as generating the following files:
- NewPortType.cs – which contains the Service stub and proxy classes
- Output.config – which is service specific configuration that can be added to the host's application configuration file. We aren't going to use this, so it can be safely deleted. The configuration will be done manually, in code.
- Within NewPortType.cs there will be an abstract class generated, which will form the basis of our service. See Figure 5 - Service abstract class. Create a new class called NewService.cs and add the code shown in Figure 6 - Service implementation code.
- Compile the External.Service project.
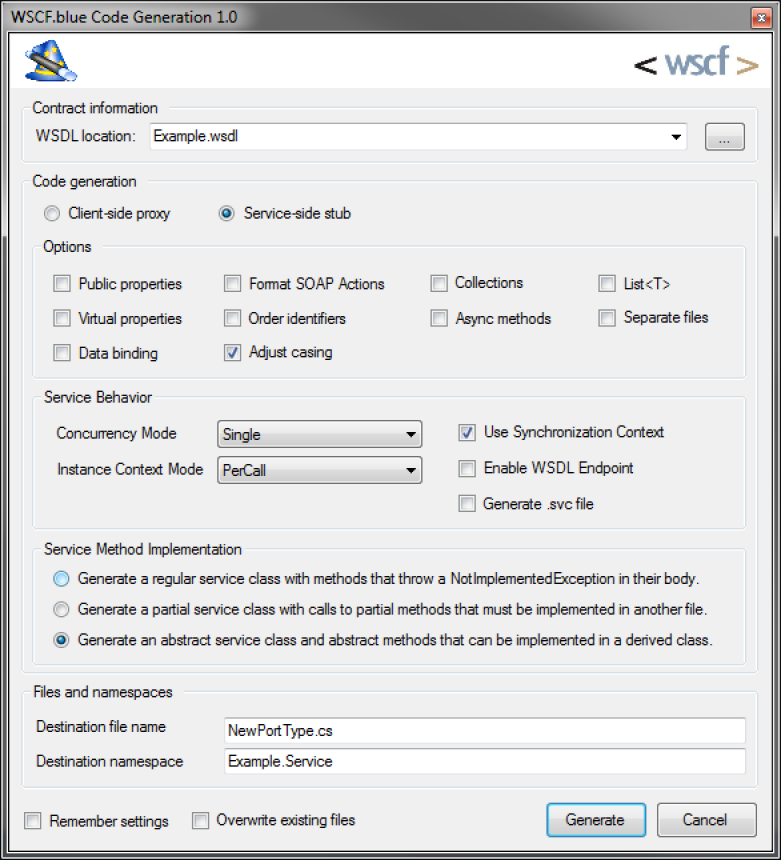
Figure 4 - WSCF.blue server-side configuration

Figure 5 - Service abstract class

Figure 6 - Service implementation code
At this point, you've created a set of proxy classes that are used to provide the server side of the service, and the implementation behind to actually do something to handle the requests coming in, as well as send back a response. At this point, the service is complete, but to consume it from a client application, you'll need to host it first.
Hosting a Service
Next, add a new console application to the solution. This will be the host application. You'll instantiate a ServiceHost instance for the service type and configure a single endpoint.
- Go to the Solution Explorer and add a new Console Application project to the solution. Name the new project Example.Host, as shown in Figure 7 - Creating the Example.Host Console Application project.
- Add a reference to the System.ServiceModel assembly, and add the following using statement to Program.cs:
using System.ServiceModel; - You will be writing code to host the NewService type. Before you can do this, you must add a reference to the Example.Service project.
- Create a ServiceHost instance and endpoint for the service. Open Program.cs in the code window and modify the Main() entry point, adding the code show in Figure 8 - Example.Host implementation. This code initialises a ServiceHost instance specifying the service type and a base address where relative service endpoints can be located. Is also adds a single relative endpoint for the service. In this case, a base address is provided for HTTP protocol, and the relative endpoint uses one of the standard bindings, BasicHttpBinding, based on HTTP protocol.
- Compile and run the host to verify that it works. From Solution Explorer, right-click on the Example.Host project node and select "Set as Startup Project." Run the project (F5), and you should see console output similar to that shown in Figure 9 - Example.Host running the service. Stop debugging and return to Visual Studio.

Figure 7 - Creating the Example.Host Console Application project

Figure 8 - Example.Host implementation

Figure 9 - Example.Host running the service
You now have a host application for the service. When it is running clients will be able to communicate with the service. The next step is to create a client application.
Creating A Proxy To Host The Service
Now you will create a new console application to test the service. To do this, the client requires metadata from the service and information about its endpoint. This information will be used to initialise a client proxy that can invoke the service operations.
- Go to Solution Explorer and add a new Console Application to the solution. Name the new project Example.Client, as shown in Figure 10 - Creating the Example.Client Console Application project.

Figure 10 - Creating the Example.Client Console Application project
- Create the service contract, on the client, using WCSF.blue, by right-clicking on the Example.Client node in the Solution Explorer and select "Choose WSDL to Implement…" from the WSCF.blue menu. A dialog will appear. Choose the Example.wsdl file you saved from Section 6.2 and complete the information as shown in Figure 11 - Creating the Client-side proxy classes using WSCF.blue. The following settings are:
- Client-side proxy – generate the classes for the client;
- Adjust Casing – which simply changes the casing of the classes to match the conventions of C#
Figure 11 - Creating the Client-side proxy classes using WSCF.blue
- WCSF.blue will add a System.ServiceModel reference to your project, as well as generating the following files:
- NewPortType.cs – which contains the client proxy classes
- Output.config – which is service specific configuration that can be added to the client's application configuration file. We aren't going to use this, so it can be safely deleted. The configuration will be done manually, in code.
- Now you can add code to invoke the service endpoint. Open Program.cs and modify the Main() entry point by adding the code as shown in Figure 12 - Example.Client implementation. This code uses the ChannelFactory to create a new channel to invoke the service. This strongly typed channel reference acts as a proxy. The code also initialises an EndpointAddress with the correct address and binding expected by the service endpoint.

Figure 12 - Example.Client implementation
- Test the client and service. Compile the solution and run the Example.Host project first, followed by the Example.Client project. The client console output should look similar to that shown below in Figure 13 - Example.Client calling the service.

Figure 13 - Example.Client calling the service
Source Code
 Example.zip